If you are familiar with using a Unix-style command shell, you’re welcome to use one. If not, FileZilla provides a graphical interface for interacting with the NML servers. It’s installed on all NML computers and is free to download and install on your own computer.
Backup before making major changes
Before making changes to your site configuration, we strongly recommend making a complete backup of your site. Changes as simple as installing a plugin or theme will make database changes. Most installations work well, but, if an installation has problems, uninstallation scripts may be broken or may not resolve the error.
NML server access
To connect to the server, you will use the secure file transfer protocol SFTP (SSH File Transfer Protocol). For most purposes, you’ll need to use FileZilla, a shell, or another program, but for WordPress updates, you can also use the WordPress dashboard, so long as your site is set up to use HTTPS security for admin pages.
Connecting with FileZilla
FileZilla’s website includes detailed help pages, which are kept up to date as new versions are released, including a basic tutorial for connecting to the server and uploading and downloading files. In the top section of the FileZilla window, enter the protocol and NML host name as “sftp://lw4.gc.cuny.edu” plus your site’s username and password (which are specific to this server and likely not those used for your GC email) and port 2211 (or 2212 for static sites; 2213 for Moodle; 2214 for Python). On the server, your website files will probably be at /home/[user]/public_html. NML staff can help you navigate to the correct location when you first set up your site.
Exercise caution when transferring files
FileZilla’s window can be a little confusing at first. The middle section of the window is a two by two grid which shows, on one side, your local files and folders (those on your computer), and, on the other side, remote files and folders (those on the server). The top panel on each side is the directory browser (a directory is a folder) that shows the folder hierarchy where you’re navigating but does not include files. The bottom panel shows a single directory’s contents, both its files and folders. FileZilla interprets double clicks in the bottom panels as requests to transfer files, so be very careful where you click. If, for example, you update a file on your computer and double click a file with the same name on the server, you will download the server copy, writing over your newer local copy.
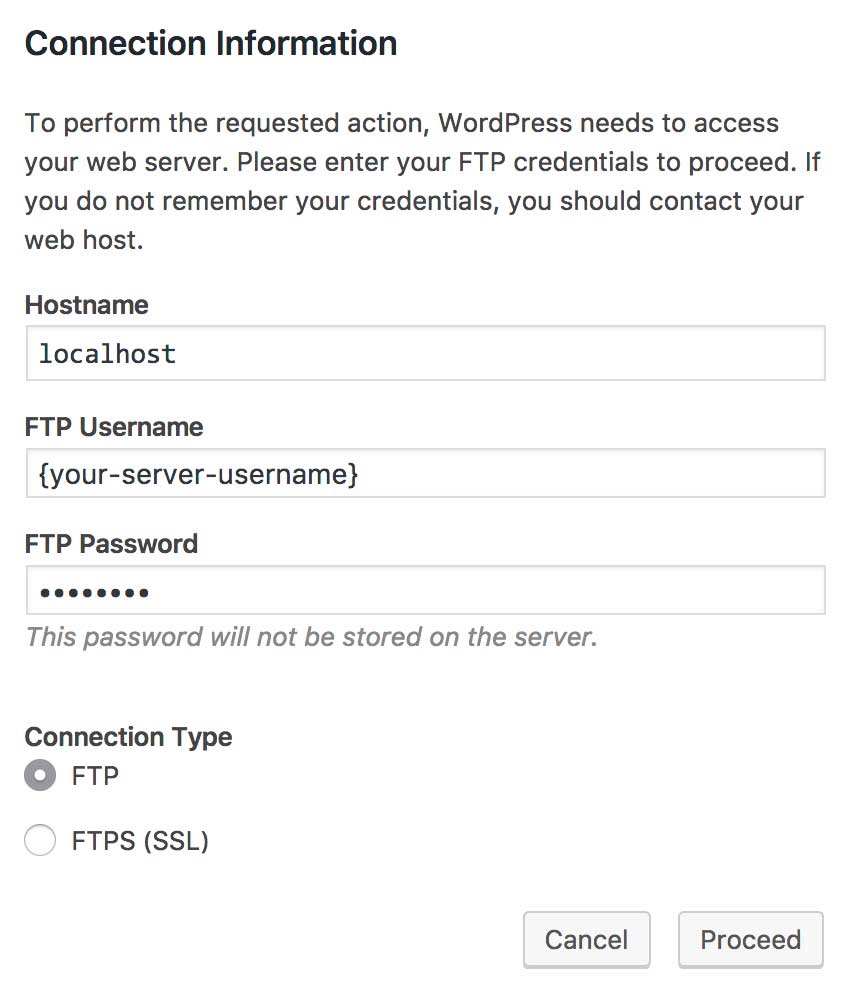
WordPress’ connection information form with FTP selected and typical NML settings.
Updating WordPress from its admin pages
WordPress updates can be performed using WordPress instead of SSH software. When an update is required, navigate to the updates page of your WordPress admin area and follow its instructions for updating WordPress core, plugins, and/or themes. It’s important to update all of them, and each requires a separate action on the updates page. After clicking the appropriate update button, you’ll see a screen with fields including hostname, user name, and password. You may also need to specify that you’re using the FTP protocol; FTPS will not work. The hostname in this form is always “localhost”. Your username and password are the same you use for access with FileZilla.
The same connection information can be used if you use WordPress’ built in tools for installing and deleting plugins and themes.
Files and directory permissions
To keep your site secure, most files should be read-only. Your login credentials allow you to upload, replace, edit, and delete any of your files—all of which are collectively called “write permissions”—but the server’s Apache software should not have the same access. This prevents situations in which a security flaw in your CMS or a plugin could allow someone to upload malicious code that edits your CMS itself. However, Apache does need access to a place where it can save and edit uploaded files, such as images, PDFs, and any other non-textual content. If you’re curious about more details of how permissions work, WordPress’ file and directory permissions help page includes a general explanation of permissions on a Unix-like server.
CMS and extension instructions will specify exactly when and where you’ll need to modify permissions. (You will almost never otherwise need to change permissions, and doing so can cause security problems.) You can find specified files or directories in the remote browsing column of FileZilla, right click, and select “File permissions…” to edit the permissions as required by your CMS. Generally, you will need to permanently enable write permissions for a file uploads directory and, possibly, temporarily enable write permissions for one or more configuration files, which will allow your CMS’s built in installation scripts to make changes. Be sure that configuration files are not left as editable after installation.